Projectors are an important tool for presentations, movie screenings and even gaming. They allow us to display images on a much larger scale than a traditional screen or monitor. However, sometimes, the projected image may need to fit more perfectly onto the screen or surface you are using.
This can cause distortion, blurriness or cutoff edges in the projection. In this comprehensive guide, we will discuss how to adjust your projector to fit your desired screen size. Say goodbye to distorted images or awkwardly placed projectors!
Understanding Projector Aspect Ratio
Before we dive into adjusting the projector, it is important to understand the aspect ratio. This refers to the proportional relationship between the width and height of an image or object.
Most projectors have a default aspect ratio of 4:3, which is similar to traditional television screens. However, modern devices such as laptops and smartphones have an aspect ratio of 16:9, making them wider than projectors.
This means that if you connect your laptop to a projector with a default aspect ratio of 4:3, there may be blank spaces or cutoff edges in the projection.
To avoid this issue, it is recommended to adjust your projector’s aspect ratio according to the device you are using to project.
Adjusting Projector Aspect Ratio
To adjust the aspect ratio of your projector, follow these steps:
- Check for a remote control or buttons on the projector itself that allow you to access the menu.
- Look for the “Aspect Ratio” or “Screen Size” option in the menu.
- Select the appropriate aspect ratio based on your device (4:3 for traditional devices and 16:9 for modern devices).
- If there is no specific option for aspect ratio, look for a “Zoom” function and use it to manually adjust the size of the projected image until it fits your screen perfectly.
- Save and exit the menu.
If you are unable to find these options on your projector, consult the user manual or contact the manufacturer for assistance.
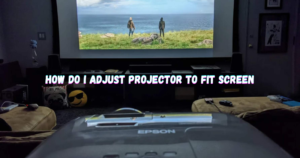
How Do I Adjust the Projector To Fit the Screen?
Once you have adjusted the aspect ratio of your projector, it’s time to align the projection with your desired screen size. The projector screen size to adjust is the most important step. Your projector may have a feature to automatically adjust the projection size, but it is still recommended to manually adjust for best results.
Measure the Projector-to-Screen Distance
Start by measuring the distance between your projector and screen. This will help you determine how far or close the projector needs to be from the screen for a perfect fit. Additionally, note down the height and width of your screen. This measurement is known as the throw distance. And it will be essential to calculate the size of your appropriate screen.
Calculate the Ideal Screen Size
To calculate the ideal screen size for your projector, you can use a simple formula:
Projector-to-Screen Distance (inches) x 0.84 = Recommended Screen Size (inches)
For example, if your projector is 120 inches away from the screen, the recommended screen size using this formula would be approximately 100 inches.
Follow these two methods to adjust projector screen size:
Adjusting the Projector Position
- Move the projector closer or further away from the screen as needed, using the measurements you took earlier.
- Use a spirit level or other levelling tool to ensure that the projected image is not slanted or distorted.Adjusting the Screen Size on the Projection
- If your projector has a feature for manual zoom and focus adjustment, use it to resize and sharpen the projected image until it fits perfectly onto your screen.
- You can also try adjusting the keystone correction settings, which helps correct trapezoid distortion caused by projecting at an angle.
Once you have adjusted both aspects, check for any remaining distortions or cutoff edges. If necessary, make minor adjustments until you are satisfied with the projected image.
Mark the Screen Area
To save yourself from having to adjust the projector every time, it is recommended to mark the appropriate screen size on your projection surface. This can be done using masking tape or a similar material.
Marking the screen area will also come in handy if you need to change the projection surface or move the projector to a different location. You can refer to the marked area for a quick and accurate setup.
Test and Adjust as Needed
After adjusting and marking the projection, it is important to test it with different content, such as slides, videos or games. This will help you ensure that the projected image fits perfectly for all types of content.
Utilize Projector Zoom and Lens Shift
Some projectors come with additional features such as zoom and lens shift. These can be used to further adjust the projected image and make sure it fits your screen perfectly.
- Zoom: Zoom feature allows you to manually resize the projected image without having to move the projector itself. It is useful if you need to adjust the projection size for different screens or surfaces.
- Lens Shift: This feature allows you to move the position of the projected image up, down, left or right without affecting its size or aspect ratio. This is particularly useful if your projector needs to be placed in a centered position. Fine tune the lens shift until the projected image is perfectly centered on your screen.
Keystone Correction
As mentioned earlier, keystone correction helps correct trapezoid distortion caused by projecting at an angle. Most projectors have a manual or automatic keystone correction feature, which allows you to adjust the image & shape of the projected image. Trapezoid shape projection can happen if your projector is not placed at a 90-degree angle to the screen.
It is important to note that using this feature can affect the sharpness and quality of the projected image. It is recommended to adjust the projector position instead of relying on keystone correction. However, in some cases, such as ceiling-mounted projectors, keystone correction may be the only option.
Consider Screen Gain
Screen gain refers to the reflectivity of a projection surface. A higher screen gain means more light is reflected towards the audience, resulting in a brighter image. If you are using a high-gain screen, it is important to adjust your projector image brightness and contrast accordingly for optimal viewing.
Account for Screen Masking
If you are using a projection screen with masking, make sure to adjust the projector’s aspect ratio to account for the masked areas. This will ensure that the projected image size fits perfectly onto the visible portion of your screen.
Finalize the Screen Positioning
After making all the necessary adjustments, finalize the positioning of your screen and projector. Secure the projector in place and make sure it is stable to prevent any accidents or disruptions during use.
Follow these steps and tips to adjust your projector for the perfect screen fit and enjoy an immersive viewing experience. Remember, it is always better to take the time to properly adjust your projector for optimal results rather than settle for a subpar projection. If you encounter any difficulties or have questions, refer to the user manual or contact the manufacturer for further assistance.
FAQs
Why does my projector not fit my screen?
There could be several reasons for this, such as incorrect projector-to-screen distance, improper screen size calculation, or incorrect aspect ratio settings. Additionally, some projectors may have a limited range of adjustments and may need help to fit perfectly onto certain screen sizes.
What determines the screen size of a projector?
The screen size is determined by the projector-to-screen distance and throw ratio of your projector. It is important to check these specifications before purchasing a projector to ensure it will fit your desired screen size.
How to calculate screen size?
To calculate the screen size, you can use the formula: projector-to-screen distance (inches) x 0.84 = recommended screen size (inches). Alternatively, you can also use an online calculator that takes into account your projector’s throw ratio and screen aspect ratio.
What is the best height for a projector screen?
The height of the projector screen should be based on the viewing angle of your audience. It is recommended to have the bottom edge of the screen at least 4 feet above ground level for a standard seated audience. However, this may vary depending on your specific setup and seating arrangements.
Conclusion
In conclusion, Properly adjusting your projector for the perfect screen fit is crucial for an enjoyable viewing experience. By following the steps and tips outlined in this guide, you can ensure that your projected image is sharp, clear, and fits your desired screen size. Remember to take into account factors such as keystone correction, screen gain, and masking when making adjustments.
With a little patience and careful calibration, you can achieve optimal projection results every time. So, take your time, follow these guidelines and enjoy a flawless viewing experience with your projector!
And remember, as technology advances and new features are introduced, always stay updated with the latest user manuals and guides for optimal projection results. Now, go forth and enjoy a seamless viewing experience with your perfectly adjusted projector.